Piping & Instrumentation Diagrams : P&IDS

Published - Tue, 17 Oct 2023
Created by  modcal modcal

Piping & Instrumentation Diagrams : P&IDS

Piping and Instrumentation Diagram (P&ID) is a drawing elaborating the details of piping and instrumentation of a processing plant, developed at the design stage. P&ID is later used for assistance for construction of the corresponding plant and for operating that plant. P&IDs of a plant are developed by process design engineers and are followed by instrumentation and piping engineers. A P&ID is normally developed from a Process Flow Diagram (PFD) which captures the basic process flow, at the design stage of a plant

A P&ID should provide following data to piping and instrument engineers, to construction teams and to the operators:

  1. Equipments – tanks, vessels, heat exchangers, pumps, compressors, columns etc. have to be indicated with type, reference tag numbers, basic design data, spares etc.
  2. Lines – reference tag numbers, piping material class, line size, fluid service, insulation type and thickness etc. Sometimes process data such as line operating pressure, temperature and flowrates is also represented on the P&ID lines.
  3. Some other piping requirements – such as slope, special insulation such as heat tracing, minimum / maximum piping distance requirements along with their values are also shown on P&IDs.
  4. Manually operated piping valves – valve type (ball valve, gate valve, check valve etc.), valve size, Locked closed/open, sealed closed/open, normally closed/open etc.
  5. Piping fittings – Flanges, reducers/expanders, spectacle blinds, spacers, strainers etc. along with their size wherever necessary.
  6. Drains and Vents – are usually indicated using typical symbols along with their size and type (single valve, double valve etc.).
  7. Automated valves – Shutdown valves (SDV), control valves, blowdown valves (BDV) are indicated with size if it is known. Also fail position (fail open/fail close/fail in position) is indicated for each of these valves.Actuator connection and type is indicated. Reference instrument tag numbers are attached to every automatic valves.
  8. Safety Valves – Pressure relief valve (PRV) or Temperature relief valve (TRV) are indicated with their instrument tag numbers, setpoints, types are indicated by different symbols.
  9. Instruments – Gauges, transmitters, local indicators, DCS indicators, interlocks and other functions have to be shown in detail on the P&ID. Interconnection between these elements has to be indicated by different types of instrument signals (hardwired signal, soft signal, pneumatic or hydraulic signal etc.). The location of the instrument elements (field mounted or DCS) is indicated by difference between symbols.
  10. Notes – are written wherever required to improve clarity for anyone referring to the P&ID. Sometime ‘Hold’ is used to indicate uncertainty about relevant data.
  11. Interconnections (OPC) – are shown between lines (piping OPC) and instrument signals (Instrument OPC) present on two different P&ID sheets. Sometime these interconnectors are also assigned with a unique tag number. For easy identification of the connections between two P&IDs. A connector present on two different drawing connection a line or a signal carries the same tag number.

Because of the numerous details involved in P&IDs for each equipment, usually only one main equipment is shown on one P&ID sheet with related instruments and piping.

Contents and function

A piping and instrumentation diagram/drawing (P&ID) is defined by the Institute of Instrumentation and Control as follows:

  1. A diagram which shows the interconnection of process equipment and the instrumentation used to control the process. In the process industry, a standard set of symbols is used to prepare drawings of processes. The instrument symbols used in these drawings are generally based on International Society of Automation (ISA) Standard S5. 1.
  2. The primary schematic drawing used for laying out a process control installation.

P&IDs play a significant role in the maintenance and modification of the process that it describes. It is critical to demonstrate the physical sequence of equipment and systems, as well as how these systems connect. During the design stage, the diagram also provides the basis for the development of system control schemes, allowing for further safety and operational investigations, such as a Hazard and operability study commonly pronounced as HAZOP.

For processing facilities, it is a pictorial representation of

  • Key piping and instrument details
  • Control and shutdown schemes
  • Safety and regulatory requirements
  • Basic start up and operational information

List of P&ID items

  • Instrumentation and designations
  • Mechanical equipment with names and numbers
  • All valves and their identifications
  • Process piping, sizes and identification
  • Miscellanea – vents, drains, special fittings, sampling lines, reducers, increasers and swaggers
  • Permanent start-up and flush lines
  • Flow directions
  • Interconnections references
  • Control inputs and outputs, interlocks
  • Interfaces for class changes
  • Computer control system
  • Identification of components and subsystems

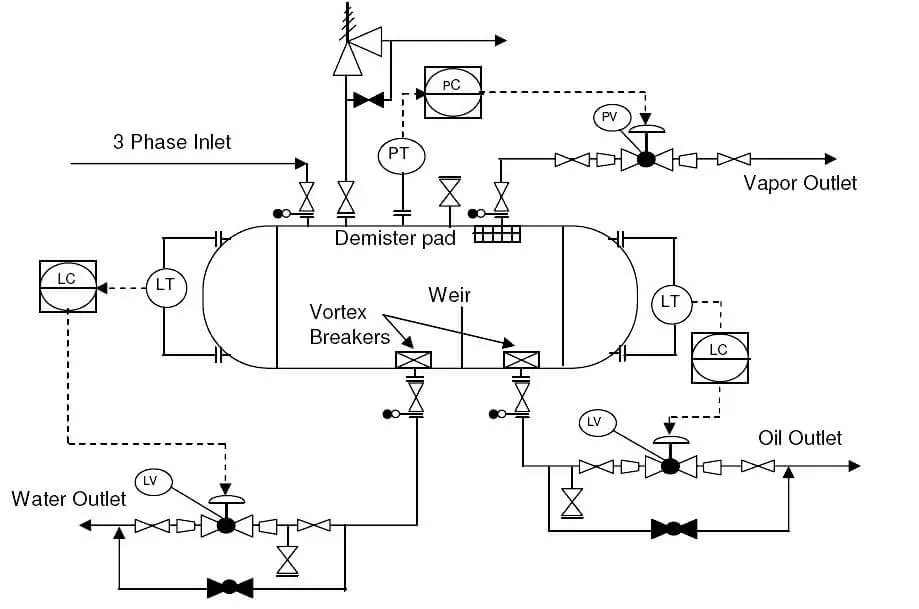
Piping and Instrumentation Diagram Example :


Comments (0)

Popular categories
Latest blogs
Pipe Modeling using AVEVA E3D software
E3D is a 3D piping design software that integrated the good features of PDMS, AutoCAD, and SP3D into a single module. So, obviously, this is the next-generation most advanced software. Developed by AVEVA, The software is designed for a powerful 3-Dimensional design solution experience. Its clash-free multi-discipline design interface (Fig. 1) will reduce the design cost by minimizing rework and maximizing engineering and design efficiency. Moreover, the software is very easy to adopt and it provides the best project execution capabilities. The software is becoming very popular among piping designers circle.PlayUnmuteLoaded: 3.47%Remaining Time -49:11Auto(360pLQ)ShareFullscreenStress Analysis of Pump Piping in Caesar IIFig. 1: E3D Design InterfaceFeatures of E3DSome of the main features of this powerful 3D software are listed below:Aveva E3D combines all the best features of PDMS, Autocad, and SP3D.It is much faster and easier than other 3D software that is currently in market use.It is very user-friendly.E3D introduces the Auto-Route button (Refer to Fig. 1) which minimizes the time for the pipe routing.Laser scan models can be accessed directly in E3D without requiring LFM software to open the scan model.Introduced the Clip option which reduces the complication of complex projects.Structural, Primitive modification has been simplified.In-Draw 3D-model can be viewed by tool 3D-EditPipe Modeling in E3DPipes are termed veins of any oil & gas plant. So designing pipes and modeling those following design codes and established best practices are very important. In this video tutorial, we will see how the piping is modeled using E3D software.There are two videos. The first one explains the pipe modeling in the conventional method and 2nd video will explain the pipe modeling using the Auto-Route button.Tutorial-1: Pipe Modeling in E3DPipe Modeling in AVEVA E3DTutorial-2: AutoRoute Pipe in E3D

Tue, 17 Oct 2023

The Basics Of Piping Stress Analysis
Piping systems constitute a major part of modern chemical plants, by some estimates accounting for 20–35% of the total cost of facilities. Unfortunately, piping systems have caused many reliability and safety incidents. So, their reliability, integrity and safety demand rigorous evaluation.Piping stress analysis is a critical tool to prevent premature failure of piping and piping components and ensure piping stresses and all related loads remain within allowable limits. It enables the timely checking and verification of important parameters such as stresses, loading, leakage, safety of related and connected equipment (nozzles), and piping deflection. Here, we’ll review the basics of piping stress analysis and also present a case study.Piping configuration, nozzle loads, spans and supports all impart stresses on the system. It is essential to confirm that different parts and components can withstand the stresses (internal pressure, thermal stresses, etc.) posed by regular, transient and abnormal operations as well as maintenance, e.g., pressure testing. In addition, the analysis should consider occasional and intermittent events such as vibration, fluid hammer, flow-induced vibration, high wind, earthquakes and more.Flexibility AnalysisPiping stress analysis involves different tasks and checks. A key one is flexibility analysis. This evaluates the ability of piping to deform elastically. A piping system should be flexible enough to handle potential thermal expansion/contraction or movement of supports or piping endpoints, thus preventing failure of piping and supports due to excessive stresses. Deciding upon the necessary flexibility requires consideration of:1. Maximum allowable limit of stress in various parts and components. The many reported failures in welds, pipes, fittings, elbows, etc., underscore this as a major concern. An important factor is operating temperature because both high and low temperature reduce the allowable stress. Another factor in high-pressure systems (particularly for large-diameter piping) is hoop stress, which usually is high and can account for a substantial portion of the overall stress and leave a low margin for stresses due to bending, torsion, axial deflection, etc. For instance, a high bending load on a flange set may cause a leak. The pressure rating limits of valves, flanges and other equipment require checking.2. Maximum allowable forces and moments the piping system can impose on any connected nozzle. Often called the nozzle load limits, they can be a significant limiting factor, particularly on delicate equipment where allowable nozzle loads could be very low.3. Maximum allowable load that can be applied on supports. Different factors such as the support itself or supporting structure can set this limit.4. Displacements existing within the piping system. An example is the gap with nearby piping systems.A systematic procedure is needed to check all these limits for every section and subsystem of the entire piping system. Support location is very important because wrong support placement may lead to failure of that section and then of the whole associated piping system. So, first the maximum permissible span is calculated by considering all loading conditions. This often is a set of estimated spans that later are confirmed via a thorough stress and modal analysis. Support locations and types then are inserted and adjusted until all flexibility requirements (stress, displacement, reaction loads, nozzle loads, etc.) and other requirements (such as modal, dynamic, etc.) are satisfied.Concerns And ChallengesPiping stress analysis poses a number of key concerns. The first relates to code stress and allowable stress. Different codes and standards offer disparate methods to calculate code stress and allowable stress.Other major concerns are issues around stress intensification factor (SIF), flexibility factor, branch connections and, generally, any complex fittings or components in piping. The geometry of fittings (such as branch connections, bends, reducers, etc.) can significantly influence the flexibility of a piping system. They change cross-sectional shape under the action of bending moments and other loadings and, thus, provide greater flexibility than the same length of straight pipe. This action also increases the stress levels in the fittings. The SIF and flexibility factor can account for these phenomena. However, some challenges can arise. For instance, larger-diameter branch connections sometimes lead to inefficient distribution of piping loads, owing to the lack of consideration of the inherent flexibility of a branch component.The software for piping stress analysis is relatively straightforward. However, mistakes too often occur because of lapses in the critical preliminary tasks of interpreting process data and providing appropriate inputs such as temperature, pressure, operating conditions, etc. Changes in piping material specification, tie-in locations, and revisions in applicable codes or standards need adequate attention. Excursions, e.g., low temperature (for instance, due to depressurization, repressurization or the like), high temperature and elevated pressure, as well as transient cases and extreme operating conditions require great care. It is essential to exercise good judgement in defining the operating conditions of isolated sections, transition parts and those items not subject to defined process conditions in each operating case. Usually, a piping system can encounter multiple potential scenarios. Indeed, it is not uncommon to specify 8 or 9 operating cases for some piping systems. This leads to a far greater number of loading cases — often 100 or more — because they combine elements of different scenarios.Verification of results is another important step, especially with software that involves manual specification of input and load cases. The thermal movement, deformations, stresses, forces and other output results require careful checking to ensure no input or numerical error has occurred.In addition, as already mentioned, each piping system can encounter a variety of operating cases. Usually, the operating or loading case that is the critical one is not known; a complete set of simulations is needed to find it. A further complication is that process conditions and materials may differ in connected piping items and parts. In other words, even in a single operating scenario, connected parts may confront markedly different operating conditions. For instance, in a cold operating case, two connected piping components might experience different temperatures and pressures. Moreover, the components might be fabricated from different materials. Because a system generally contains many different parts and components such as pipes, fittings, valves, flanges and equipment, the overall situation gets very complicated or even confusing. Such interactions between different parts fabricated from different materials operating under different process conditions in different scenarios make piping stress analysis more challenging and complex.Process PipingFigure 1. This piping, shown during construction, requires careful stress analysis to ensure it can cope with attached equipment.Another challenge is that different sets of limits and allowable parameters need checking. Confirmation of stresses, nozzle loads, support loads, displacements and other parameters is crucial as is verification that those key parameters are within specified limits in all possible combinations.The next source of complication is when a parameter, such as stress, load, etc., exceeds the specified limit in a loading case. The formulated modification to solve the issue should not cause any difficulties in other operating cases, and all key parameters (stresses, loads, etc.) in all those combinations and scenarios still should stay within specified limits.Supports And High StressThe details of supports such as support types, their load limits, their characters and options can significantly affect the piping layout and piping stress analysis. Weak supports with low load limits can cause serious problems because support loads can easily exceed the limits, necessitating re-configuration. Proper support may require a variety of kinds of support to cover different locations and types of piping.The general strategy is to use an optimum stiff support scheme to keep movements as well as modal and natural frequencies under control. Piping can be subjected to a wide range of dynamic excitations from rotating machines, flow-induced vibration, pressure transients and other causes. Therefore, it makes sense to adopt a conservative support approach (or relatively stiff scheme); this typically involves the use of gripping and clamping supports, such as U-bolts, clamps, guides with optimum gaps and the like, to keep the piping under control. If more flexibility is needed, then converting one or two guides or clamps to resting supports can provide some local freedom, e.g., to let piping move laterally in those supports.When high stresses, support loads or nozzle loads are spotted, then changes become necessary. Solving the problems and optimizing the overall piping requires studying different options and configurations. This often is a matter of trial and error, although we’ll cover some guidelines to cure each set of problems.Different root causes can produce high stresses. However, a common problem is localized deformation leading to locally high stresses. This often arises where different piping systems with significantly different stiffness are connected in series. This leads to the flexible (less-stiff) piping section absorbing a large portion of thermal movements produced by the entire piping system — potentially resulting in overstressing of that section. Other situations also can prompt localized deformation. For instance, in a system of uniform piping size, a configuration in which the neutral axis or thrust line is situated close to the major portion of the line may result in a very small offset portion of the piping line absorbing most of the thermal movements.In many piping systems, the thermal movements cause considerable stresses; absorbing thermal movements and relieving the piping from excessive stresses may call for one or more expansion loops. These can be Z-shape or U-shape loops provided in the run of piping. However, expansion loops require extra space, elbows, bends and additional supports (and steel structure) that could adversely affect both initial and operating cost. Therefore, it is necessary to optimize the geometry, the number of expansion loops and their supports. A favored approach is to reduce the number of loops in a single piping system or decrease the length of the loop itself, so long as stresses are within safe limits.Elbows usually are the weakest part of an expansion loop; many plants have reported breaks in these elbows. So, design of expansion loops demands care. Many methods and software packages for expansion-loop dimensions rely on empirical models rather than engineering fundamentals. Proper piping stress analysis is needed for all expansion loops to calculate accurate movements, stresses and support loads.A Case StudyLet’s now look at the stress analysis of a section of a critical 2-in. schedule-80 piping of class 1500# in a processing facility. The piping serves different operational purposes including depressurization of a crucial piece of fixed equipment. Eight different operating cases were considered. These included normal operation at a temperature of 31°C and pressure of 134 Barg; a cold case of -45°C such as when gas gets cooled due to Joule-Thomson effect during depressurization of the equipment; and a hot case of 66°C.This section of piping is 2.9 m in horizontal (x) direction with a class 1500# valve located at 0.36 m, 1 m in vertical upward (z) direction, and 0.96 m in lateral (y) direction where it connects to the fixed equipment with an elbow and small piece of pipe through a flange set and nozzle. Different charts and tables for allowable span of 2-in. schedule 80-piping gave allowable spans between 3.6 m and 4.7 m. An initial assessment indicated a support might be needed for this section of piping. This, at first, seemed correct because a relatively heavy valve was in the section. However, such charts and tables are known to be conservative and only are suitable for rough estimations. In addition, access and other issues made providing a support in that section difficult.Accurate stress analysis always is the best way to see if a piping configuration is suitable and whether or not additional support is required. Using stress analysis software, the maximum stress was obtained around 100 Mpa at the elbow/pipe juncture near the nozzle equipment for the cold operation case (weight + cold temperature + pressure). Compared to an allowable stress of around 160 Mpa at the cold operating condition, the overall configuration was acceptable. Nozzle loads also were below the limits. The calculated first natural frequency was around 9.7 Hz for the dynamic movement in lateral direction (y). This exceeded the 9-Hz limit for this part of piping mandated by plant requirements. In addition, detailed studies proved there was no potential for resonance, flow-induced vibration and dynamic issues. The conclusion was the piping was acceptable — although some stringent guidelines would consider the stress, span and natural frequency as marginal — and an additional support was not required. The piping was fabricated in this way. It is operating successfully and without trouble.

Tue, 17 Oct 2023

Piping & Instrumentation Diagrams : P&IDS
Piping and Instrumentation Diagram (P&ID) is a drawing elaborating the details of piping and instrumentation of a processing plant, developed at the design stage. P&ID is later used for assistance for construction of the corresponding plant and for operating that plant. P&IDs of a plant are developed by process design engineers and are followed by instrumentation and piping engineers. A P&ID is normally developed from a Process Flow Diagram (PFD) which captures the basic process flow, at the design stage of a plantA P&ID should provide following data to piping and instrument engineers, to construction teams and to the operators:Equipments – tanks, vessels, heat exchangers, pumps, compressors, columns etc. have to be indicated with type, reference tag numbers, basic design data, spares etc.Lines – reference tag numbers, piping material class, line size, fluid service, insulation type and thickness etc. Sometimes process data such as line operating pressure, temperature and flowrates is also represented on the P&ID lines.Some other piping requirements – such as slope, special insulation such as heat tracing, minimum / maximum piping distance requirements along with their values are also shown on P&IDs.Manually operated piping valves – valve type (ball valve, gate valve, check valve etc.), valve size, Locked closed/open, sealed closed/open, normally closed/open etc.Piping fittings – Flanges, reducers/expanders, spectacle blinds, spacers, strainers etc. along with their size wherever necessary.Drains and Vents – are usually indicated using typical symbols along with their size and type (single valve, double valve etc.).Automated valves – Shutdown valves (SDV), control valves, blowdown valves (BDV) are indicated with size if it is known. Also fail position (fail open/fail close/fail in position) is indicated for each of these valves.Actuator connection and type is indicated. Reference instrument tag numbers are attached to every automatic valves.Safety Valves – Pressure relief valve (PRV) or Temperature relief valve (TRV) are indicated with their instrument tag numbers, setpoints, types are indicated by different symbols.Instruments – Gauges, transmitters, local indicators, DCS indicators, interlocks and other functions have to be shown in detail on the P&ID. Interconnection between these elements has to be indicated by different types of instrument signals (hardwired signal, soft signal, pneumatic or hydraulic signal etc.). The location of the instrument elements (field mounted or DCS) is indicated by difference between symbols.Notes – are written wherever required to improve clarity for anyone referring to the P&ID. Sometime ‘Hold’ is used to indicate uncertainty about relevant data.Interconnections (OPC) – are shown between lines (piping OPC) and instrument signals (Instrument OPC) present on two different P&ID sheets. Sometime these interconnectors are also assigned with a unique tag number. For easy identification of the connections between two P&IDs. A connector present on two different drawing connection a line or a signal carries the same tag number.Because of the numerous details involved in P&IDs for each equipment, usually only one main equipment is shown on one P&ID sheet with related instruments and piping.Contents and functionA piping and instrumentation diagram/drawing (P&ID) is defined by the Institute of Instrumentation and Control as follows:A diagram which shows the interconnection of process equipment and the instrumentation used to control the process. In the process industry, a standard set of symbols is used to prepare drawings of processes. The instrument symbols used in these drawings are generally based on International Society of Automation (ISA) Standard S5. 1.The primary schematic drawing used for laying out a process control installation.P&IDs play a significant role in the maintenance and modification of the process that it describes. It is critical to demonstrate the physical sequence of equipment and systems, as well as how these systems connect. During the design stage, the diagram also provides the basis for the development of system control schemes, allowing for further safety and operational investigations, such as a Hazard and operability study commonly pronounced as HAZOP.For processing facilities, it is a pictorial representation ofKey piping and instrument detailsControl and shutdown schemesSafety and regulatory requirementsBasic start up and operational informationList of P&ID itemsInstrumentation and designationsMechanical equipment with names and numbersAll valves and their identificationsProcess piping, sizes and identificationMiscellanea – vents, drains, special fittings, sampling lines, reducers, increasers and swaggersPermanent start-up and flush linesFlow directionsInterconnections referencesControl inputs and outputs, interlocksInterfaces for class changesComputer control systemIdentification of components and subsystemsPiping and Instrumentation Diagram Example :

Tue, 17 Oct 2023

All blogs